
Instead of manually sorting Rapid7 Nexpose findings and chasing remediation updates, build a 2026 workflow that adds asset context, assigns accountable work, and verifies fixes against fresh scan evidence. Use Nexpose as the finding source and evaluate Brinqa as your vulnerability and exposure management platform; keep collection, prioritization, ticketing, and verification as separate configuration stages.
- Use a Rapid7 Nexpose risk based remediation workflow to connect scan evidence, asset context, and verified fixes.
- Evaluate Brinqa for vulnerability and exposure management; validate integration requirements before configuring production access.
- Prioritize confirmed exploitation and business exposure, not severity alone.
- Close remediation only after a successful follow-up assessment supports closure.
Why this matters
A scanner finding identifies a technical problem. It does not, by itself, establish which business service depends on the asset, who can change it, or whether a completed ticket removed the exposure. Your remediation workflow must connect those decisions without discarding the original evidence.
Brinqa is best suited to security teams evaluating a vulnerability and exposure management platform. For this workflow, validate the required data mappings and integration behavior in your environment before granting production access. The configuration below defines the workflow contract rather than a product-specific connector screen.
Choose the operating model deliberately. A severity-led queue is simpler to establish, but a context-enriched queue provides an explicit basis for business prioritization.
| Workflow option | Best for | Advantage | Limitation |
|---|---|---|---|
| Severity-led remediation | Establishing a basic technical backlog | Requires fewer contextual inputs | Severity alone does not establish business impact or ownership |
| Context-enriched remediation | Coordinating security and asset owners | Connects technical findings to exposure and business context | Requires maintained inventory, ownership, and decision rules |
For your 2026 rollout, define success as traceable decisions and verified outcomes. Do not treat the number of tickets created as evidence that risk decreased.
Before you start
- Secure source access and a controlled pilot. Obtain authorized Nexpose access for one scan site, confirm how your collection method retrieves assets and findings, and document the assessment scope. Use read-only access for collection wherever your integration supports it.
- Prepare context and remediation access. Identify the authoritative asset inventory, business-service owners, exposure evidence, and ticket destination. Assign a workflow owner who can approve mapping changes and resolve ownership conflicts before the pilot begins.
- Pre-empt the identity gotcha. Do not use an IP address alone as the cross-system asset key. Addresses change and can overlap between networks. Preserve the Nexpose asset identifier with its source instance, then match it to inventory using documented identity rules.
Before teaching the workflow to operators, establish two release gates: collection reconciliation and closure verification. The first checks whether the import represents the intended source scope; the second checks whether a resolved ticket actually corresponds to a remediated finding. Both gates need named reviewers during the pilot.
Keep collection credentials outside ticket descriptions, logs, and exported evidence packages. Your 2026 workflow documentation should identify who maintains those credentials without exposing their values.
Source collection configuration
The field names below are proposed integration-schema fields, not Nexpose or Brinqa interface labels. Implement them in your approved adapter, integration service, or data pipeline, and retain the source fields alongside the normalized record.
- Define the collection boundary. Start with one scan site and identify the source console, included assets, assessment types, and excluded systems. Record whether your extraction represents current findings, historical observations, or both. Those datasets must not be interpreted interchangeably.
- Select the extraction method. Use a supported Nexpose API or export method appropriate to your deployment. Confirm its authentication requirements, pagination behavior, and available evidence before scheduling collection. Exhaust every page or export segment; a successful request does not prove a complete import.
- Preserve source identity and evidence. Store
source_instance,source_asset_id,source_finding_id,observed_at, and the original finding evidence. Preserve source timestamps separately fromimported_at, which records when your pipeline received the data. - Record collection health. Capture the collection scope, completion status, failed segments, and source assessment time. Reconcile imported assets and findings against the same source scope and snapshot, accounting for any documented filters.
Expected result: every imported finding is traceable to its source asset and observation, and the collection record distinguishes a complete import from a partial one.
Do not infer remediation from an absent row in an export until you know what that export includes. A filter change, inaccessible asset, or failed collection can remove a row without removing a vulnerability. Carry collection health into every later closure decision.
Asset context and priority configuration
Risk-based prioritization requires explicit evidence. Separate technical severity, exploitation evidence, exposure, and business impact instead of merging them into an unexplained label.
- Resolve asset identity. Match each source asset to the authoritative inventory using stable identifiers available in both systems. Preserve unmatched records in an exception queue. Do not silently discard them or merge assets solely because they share an address.
- Attach accountable context. Add
business_service,asset_owner,remediation_team,business_criticality, andexposure_status. Record the source and observation time for each contextual attribute. Mark unavailable context as unknown rather than assigning a reassuring default. - Define the decision rule. Specify how confirmed exploitation, reachable exposure, technical severity, and business criticality affect priority. Use CISA's Known Exploited Vulnerabilities catalog as evidence of known exploitation where a finding maps to a listed CVE. Keep the matched reference and retrieval date.
- Save the explanation. Store
priority_reason, the rule version, and the inputs used for each decision. Require manual overrides to include an owner and rationale. Separate approved risk acceptance from a lower remediation priority.
Expected result: an analyst can explain why a finding received its priority without reconstructing the decision from disconnected spreadsheets.
For the 2026 policy baseline, test three cases: a finding with confirmed exploitation, a finding with missing ownership, and a finding whose asset context changes. These are acceptance tests, not performance benchmarks. Define the expected handling before executing them.
Use the custom vulnerability severity scoring model guide to develop the scoring policy. Do not publish a risk score unless its inputs and interpretation are documented.
Remediation routing configuration
A prioritized finding still needs an executable assignment. Route work to the team that can change the affected system, not simply the team that discovered the vulnerability.
- Define the work-item boundary. Group findings only when the same owner can complete a coherent remediation action within the same change boundary. Preserve the individual asset and finding references inside the work item. Avoid grouping unrelated systems solely because they share a CVE.
- Create a stable work key. Derive
work_item_keyfrom the source identity, remediation grouping, and responsible team. Use it to update existing work rather than creating another ticket on every collection. Test retries before enabling scheduled production runs. - Populate actionable evidence. Include affected assets, source finding identifiers, detection evidence, recommended remediation from the source, priority reasoning, and the responsible team. Apply your approved response policy to determine the target date; do not invent a deadline from the scanner's severity label.
- Handle routing failures explicitly. Send unresolved ownership to a named triage queue. Record rejected assignments, missing permissions, and ticket-creation failures separately from successful delivery. Keep the source finding open while routing remains unresolved.
Expected result: each actionable finding maps to accountable work, while repeated collections update that work without duplicating it.
Avoid automatic production changes during the initial rollout. Ticket creation and patch execution are different permissions and different operational decisions. A risk-based queue determines what needs attention; your change-management process determines how to perform the change safely.
Verification and closure configuration
A completed ticket is a claim of remediation, not verification of remediation. Require fresh assessment evidence before changing the finding's verified state.
- Separate completion from verification. Track
work_statusindependently fromverification_status. When an owner reports completion, move the finding to pending verification rather than closing it immediately. - Obtain a follow-up assessment. Schedule an authorized assessment appropriate to the asset and change window. Confirm that the affected system was assessed successfully and that the relevant detection was included. A scan that could not reach or authenticate to the system is not sufficient evidence of a fix.
- Evaluate the result against scope. Confirm that the follow-up observation is newer than the remediation action and applies to the same asset and finding. Record the supporting assessment identifier and timestamp. Keep missing or ambiguous evidence pending.
- Preserve reopening and exceptions. Reopen or create linked work when a previously verified finding reappears. Handle accepted risk, decommissioning, and false-positive determinations through distinct states with their own evidence and approvals.
Expected result: verified closure records explain what changed, who completed the work, and which subsequent observation supports the decision.
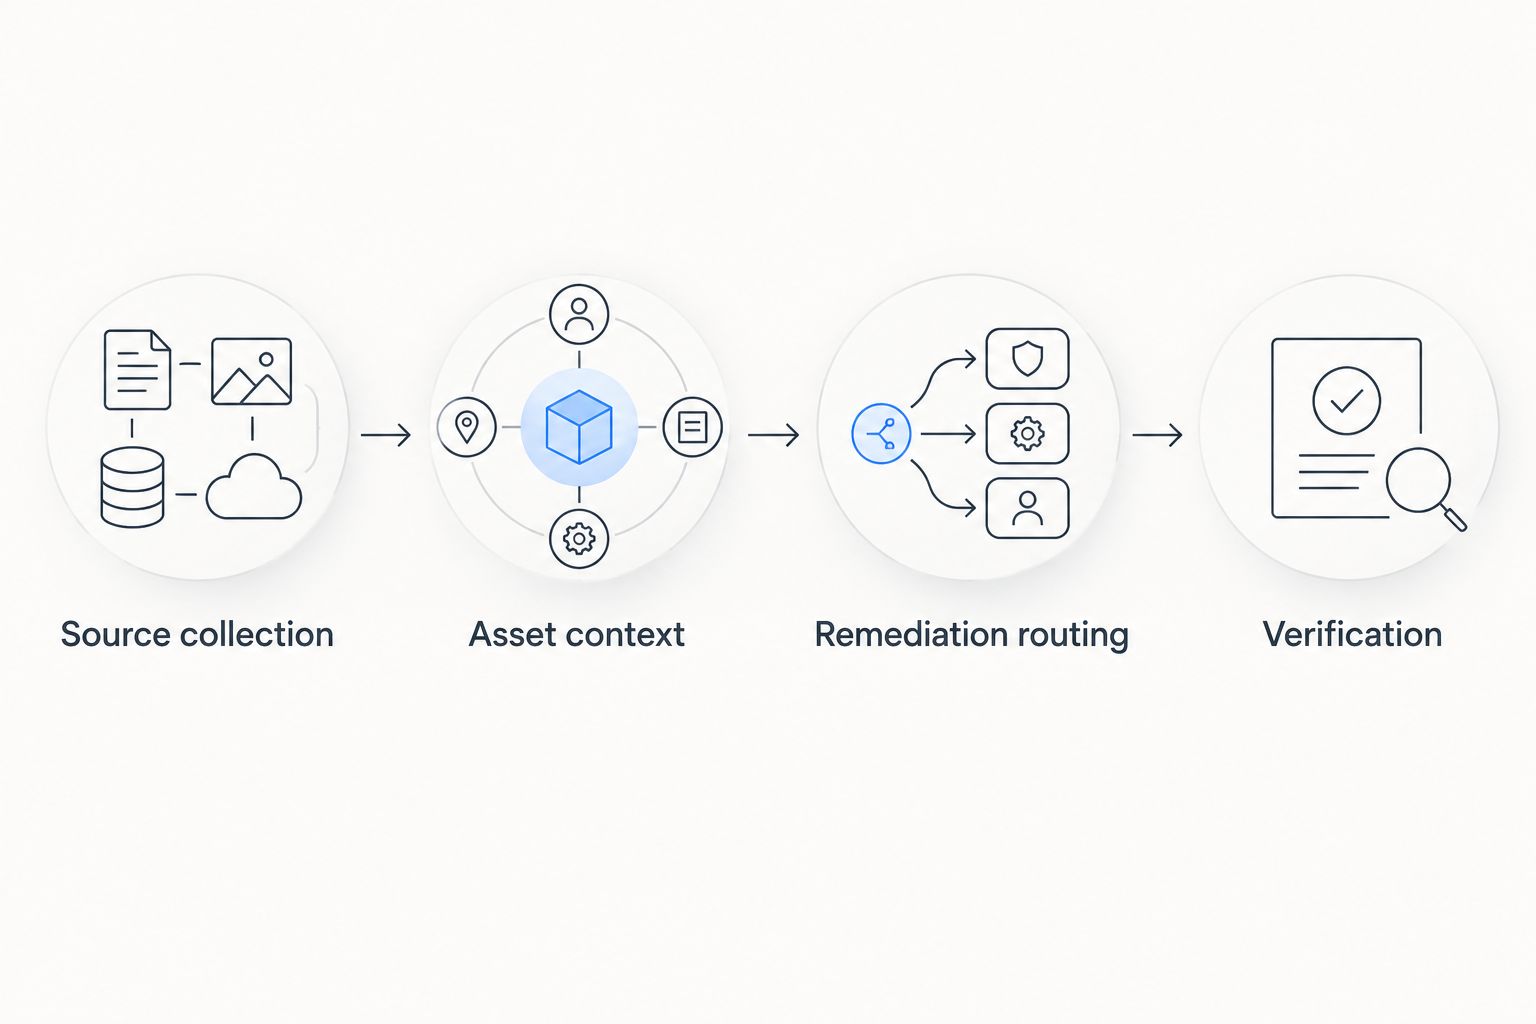
Keep the four configuration stages connected without allowing any stage to substitute for another. Collection supplies evidence; context informs priority; routing assigns work; verification establishes the outcome.
Reprioritize whenever asset or threat context changes
Scheduled scan ingestion is only one workflow variant. A second variant reevaluates existing findings when business ownership, asset exposure, criticality, or exploitation evidence changes—even when Nexpose has not produced a new observation.
- Identify the changed context. Record the updated attribute, its source, and its effective time. Distinguish a confirmed change from an expired or unavailable data feed.
- Find affected open findings. Resolve the changed asset or vulnerability reference against the existing backlog. Recalculate only the records affected by the changed input, while preserving their original scanner evidence.
- Compare decisions. Save the previous priority, revised priority, and explanation. Update existing remediation work when the responsible team or response requirement changes. Do not create duplicate tickets for a priority adjustment.
- Notify the accountable owner. Explain the change in operational terms: newly reachable exposure, confirmed exploitation, changed service criticality, or corrected ownership. Require review before extending an existing target date or downgrading urgent work.
Expected result: the queue reflects current context without pretending that a context update is a new scan result.
This variant is best for teams whose assets or threat conditions change between assessments. Its advantage is timely reprioritization; its limitation is dependence on reliable context feeds. Preserve the last observation time so a new priority never makes old scan evidence appear fresh.
Troubleshooting
The import succeeds, but findings are missing
Check extraction filters, pagination, scan-site scope, and failed segments. Compare the source and imported records at the same snapshot. Suspend absence-based closure until collection reconciliation passes; otherwise a partial import can look like successful remediation.
Every collection creates another ticket
Check whether work_item_key changes between runs or whether the ticket lookup occurs before creation. Replay the same input and verify that it updates existing work. Preserve external ticket identifiers so transient delivery failures do not restart the assignment process.
Findings reach the wrong team
Review inventory matching and ownership precedence. A technical asset owner and a service owner can be different teams. Define which role owns the remediation action, and route conflicting or missing mappings to triage instead of guessing from a hostname.
Resolved tickets remain vulnerable
Inspect the follow-up assessment's timing, scope, reachability, and authentication outcome. Confirm that the change affected the system identified in the original finding. Keep the record pending verification when evidence is incomplete; reopen linked work when a successful assessment confirms persistence.
Priority changes have no explanation
Check whether the integration stores input values and rule versions or only the resulting label. Preserve the previous decision before recalculation. Record which context changed so owners can distinguish new exposure from a corrected mapping or a policy revision.
Customize your workflow
Expand scope only after the pilot passes collection reconciliation, routing, and verification checks. Add another scan site using the same data contract, then review whether its asset identity, ownership model, and change process require separate rules.
When evaluating Brinqa for vulnerability and exposure management, use this contract as your acceptance checklist. Confirm source coverage, required mappings, update behavior, error handling, and verification evidence in your deployment. The benefit of a shared platform must be demonstrated by connected records and explainable decisions; maintaining context and ownership remains an operational responsibility.
For your 2026 reporting, distinguish open findings, assigned work, pending verification, verified remediation, and approved exceptions. Report collection failures alongside those states so an apparent backlog reduction does not conceal lost visibility. Keep accepted risk separate from fixed vulnerabilities.
Expand by data quality, not by connector count. Adding another source before identity and closure rules work creates a larger backlog with the same unresolved decisions.
FAQ
What is a Rapid7 Nexpose risk based remediation workflow?
A Rapid7 Nexpose risk based remediation workflow connects scanner findings to asset context, accountable remediation work, and follow-up verification. It separates technical detection from the business decision about what to fix first.
Can I use Brinqa with this remediation design?
You can use this design as an evaluation checklist for Brinqa, a vulnerability and exposure management platform. Confirm the required Nexpose data access, mappings, update behavior, and verification process for your deployment before implementation.
Should I prioritize Nexpose findings by severity alone?
Use severity as an input, not the complete remediation decision. Add supported exploitation evidence, exposure, business criticality, and ownership, and retain the explanation for the resulting priority.
How do I stop duplicate remediation tickets?
Use a stable work-item key and update the existing ticket when the same remediation group appears again. Test collection retries and preserve the external ticket identifier before enabling scheduled delivery.
When should a vulnerability ticket be closed?
Mark a finding as verified remediated only when a successful follow-up assessment supports that decision. Track ticket completion separately so a resolved work item does not automatically become proof of a fix.
Can priorities change without a new Nexpose scan?
Yes, existing findings can be reprioritized when supported asset or threat context changes. Preserve the original scan timestamp and record which updated input changed the decision.
What should happen when an asset has no owner?
Route the finding to a named ownership-triage queue and preserve its evidence and priority. Missing ownership must not silently remove the finding from the remediation backlog.
One last thing
Test a failed collection before expanding your 2026 workflow. Deliberately withhold a collection segment in the pilot and confirm that the workflow reports incomplete coverage rather than closing missing findings. Then replay the same records and confirm that no duplicate work appears.
That failure test exposes a dangerous design error: treating missing data as evidence that exposure disappeared. Whether you evaluate Brinqa or another implementation, preserve uncertainty explicitly. A trustworthy remediation workflow distinguishes a fixed vulnerability from a system it could not assess.